You’ve picked the paint. You’ve chosen the floors. Now someone at the lumber yard is asking what baseboard profile you want, and you’re staring blankly at a wall of moulding samples. Don’t worry, most homeowners have no idea that baseboards come in styles, let alone that the choice matters. But it does. The right baseboard ties your whole interior together, while the wrong one can quietly undermine rooms you’ve put real money into. This guide will walk you through everything you need to know before you buy.
Why Baseboards Matter More Than People Think
Baseboards do two jobs at once, and they do both quietly. The first is practical. Walls and floors rarely meet perfectly. There’s always a gap, and there’s almost always some unevenness. Baseboards cover that transition and protect the bottom of your drywall from scuffs, vacuums, and the general chaos of daily life. Without them, that exposed drywall edge would ding, chip, and absorb moisture.
The second job is visual. Baseboards add what designers call “visual weight” to the base of a room. They act like a frame, grounding the walls and creating a clean boundary between the vertical and horizontal planes. Taller, more detailed baseboards make ceilings feel higher, and rooms feel more finished. Flat, simple baseboards reinforce a clean, contemporary look. In both cases, the right baseboard is doing a lot of work you probably never consciously notice, which is exactly the point.
The Main Baseboard Styles
Flat / Modern (Shaker-Style)
Photo prompt: a bright, minimalist living room with white flat baseboards against light grey walls
Flat baseboards are exactly what they sound like: a simple rectangular profile with little to no decorative detail. Sometimes they have a very slight bevel or eased edge, but the face is otherwise smooth and clean.
When to use it: This is the go-to profile for contemporary, Scandinavian, minimalist, and Shaker-style interiors. If your home has simple cabinet doors, clean-lined furniture, and not a lot of ornamental detail, flat baseboards will feel at home.
What it suits: New builds, modern renovations, open-concept spaces, and any home where the design philosophy is “less is more.” Flat profiles also work well in small spaces because they don’t compete with anything else in the room.
One note: flat doesn’t mean cheap. A tall flat baseboard in a quality paint-grade MDF can look sharper and more intentional than a fussy traditional profile done poorly.
Stepped / Colonial
Photo prompt: a traditional dining room with white stepped colonial baseboards and warm wood floors
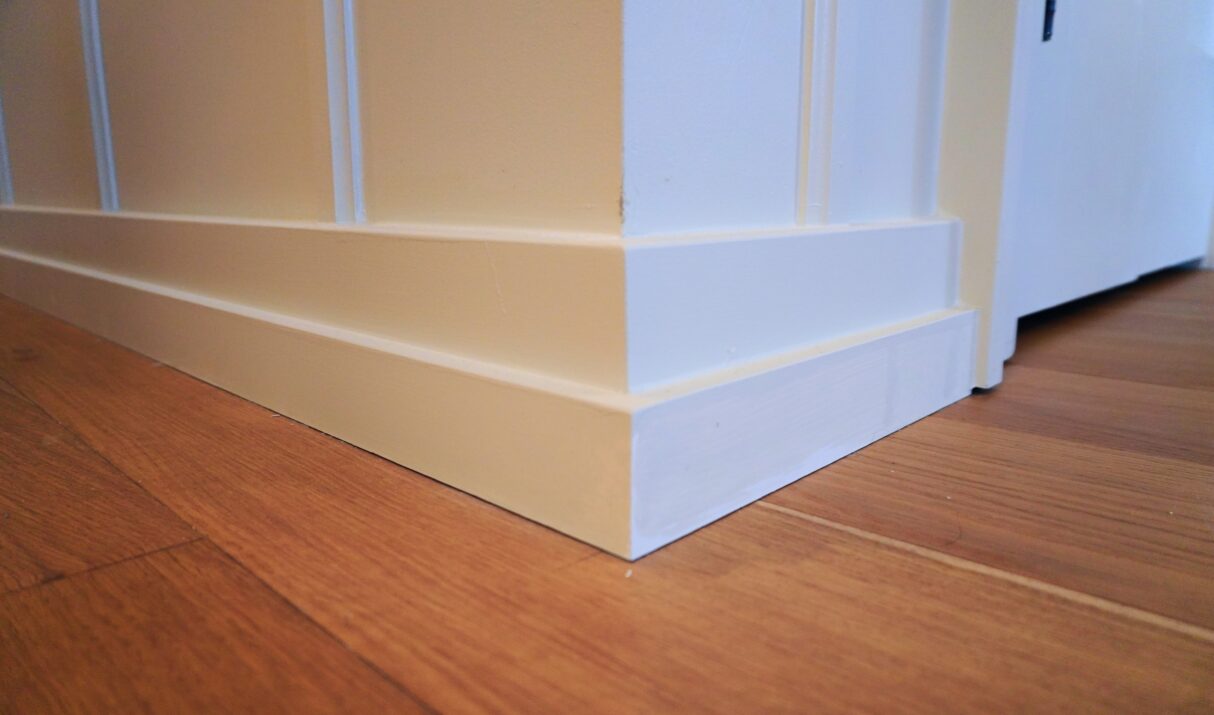
Colonial baseboards have a stepped profile, meaning the face isn’t flat but rises in one or more distinct ledges before meeting the wall. It’s a traditional look with European roots, and it’s been a North American standard for decades.
When to use it: Colonial is the middle ground. It has more character than a flat profile but isn’t as ornate as sculpted mouldings. If you’re renovating an older home and want to match what’s already there, colonial is often the answer. It also pairs well with panelled interior doors and classic hardware.
What it suits: Traditional homes, transitional renovations (somewhere between modern and classic), bungalows, two-storey family homes, and any space where you want a finished, polished look without going full heritage.
Colonial is probably the most commonly installed baseboard in Canada, which means it’s widely available and easy to match if you ever need to extend or repair a run.
Sculpted / Traditional (Ogee, Cove, Beaded)
Photo prompt: an elegant formal living room with white sculpted baseboard mouldings and crown moulding
Sculpted baseboards feature decorative curves cut into the face of the moulding. The most common profiles are:
- Ogee: an S-shaped curve that gives the baseboard a soft, classical silhouette
- Cove: a concave curve, usually at the top edge, that creates a graceful transition to the wall
- Beaded: a small, rounded bead detail along one edge, common in heritage and Victorian-era reproductions
When to use it: When you want the trim to be a feature, not just a finish. Sculpted profiles belong in formal rooms, heritage homes, and spaces with high ceilings, detailed millwork, and crown moulding. If your home has character and you want the baseboards to keep up, sculpted is the way to go.
What it suits: Victorian and Edwardian homes, high-end traditional renovations, dining rooms, formal living rooms, and heritage properties in established Edmonton neighbourhoods. These profiles also tend to look better at greater heights, which leads us to the next section.
Tall / Craftsman
Photo prompt: a craftsman-style hallway with tall, wide baseboards and matching door casing
Craftsman baseboards are defined less by decorative detail and more by height and simplicity. They’re wide, typically 4″ to 7″ or more, often with a flat or very subtly profiled face and a small cap moulding along the top edge. The effect is bold and substantial without being fussy.
When to use it: When you want the baseboard to make a statement through scale. Tall craftsman-style profiles work beautifully in rooms with higher ceilings, in hallways where you want the trim to feel architectural, and in homes that lean into that warm, handcrafted aesthetic associated with Arts and Crafts design.
What it suits: Craftsman bungalows, heritage-inspired new builds, open-concept spaces with tall ceilings, and any home where the trim is meant to be noticed. This style pairs especially well with stained or natural wood elements elsewhere in the space.
Choosing Height: The Short Answer
The general rule is simple: ceiling height drives baseboard height.
- 8-foot ceilings: 3″ to 3.5″ baseboard looks proportional and won’t overwhelm the room
- 9- to 10-foot ceilings: 4″ to 5″ is the sweet spot — substantial enough to feel intentional
- 11 feet and above: 5″ to 7″+ can be used to really anchor the space
A baseboard that’s too short for the room will look like an afterthought. One that’s too tall for a low-ceilinged space will feel suffocating. When in doubt, go slightly taller — it almost always photographs and reads better in person.
MDF vs. Solid Wood: What to Actually Buy in 2026
For most homeowners painting their baseboards, paint-grade MDF is the right choice, full stop.
Here’s why. MDF (medium-density fibreboard) is dimensionally stable, meaning it doesn’t expand and contract with seasonal humidity changes the way solid wood does. It has a perfectly smooth, grain-free surface that takes paint beautifully, often better than wood does. It’s also more consistent in profile from piece to piece, and it’s less expensive. The vast majority of professional trim installers in Canada use MDF for painted applications.
The case for solid wood is narrower but real. If you’re staining or clear-coating your baseboards rather than painting them, you need real wood — MDF doesn’t take stain well. Solid wood is also better in areas with potential moisture exposure, like mudrooms or bathrooms, where MDF can swell if it gets wet. And in some heritage renovation projects, matching existing solid wood profiles is simply the right call.
For most people doing a standard renovation with painted trim, buy the MDF. It’s easier to work with, it looks great, and it holds up well.
Matching Baseboards to Your Door Casing and Crown
Trim consistency is one of those things that’s invisible when you get it right and glaringly obvious when you don’t.
Your baseboards, door casings, and crown moulding should feel like they belong to the same family. That doesn’t mean they all need to be identical profiles, but they should share a visual language. A clean flat baseboard belongs with a flat or simple casing. An ogee baseboard looks natural alongside a more detailed door surround. Mixing a heavy sculpted baseboard with ultra-minimal casing creates a tension that most visitors won’t be able to name but will absolutely feel.
A practical starting point: choose your door casing first, since that’s often the most visible trim detail in a room, and then select a baseboard that complements it in scale and style. Crown moulding, if you’re using it, typically sits above both in visual complexity, so work from the ceiling down when planning.
This is one of the areas where getting a professional opinion early pays off. The goal is a home that feels cohesive from floor to ceiling.
Why DIY Baseboard Installation Goes Wrong
Baseboard installation looks straightforward on video. Run some moulding along the wall, nail it in, caulk the gaps, done. In practice, it’s one of the more technically demanding finish carpentry jobs a homeowner can take on.
The main issues:
Floors that aren’t level. Almost no floor in an existing home is perfectly flat. Baseboard has to follow those inconsistencies, which means scribing and cutting the bottom edge of the moulding to fit. Skip this step, and you’ll have visible gaps underneath.
Walls that aren’t plumb or flat. Drywall bows. Corners aren’t always exactly 90 degrees. Baseboards need to be scribed or back-cut to sit flush against irregular surfaces.
Outside corners. These require precise mitre cuts, and a few degrees off is very visible. If your mitre saw isn’t calibrated, or your corner isn’t square, the joint will gap.
Inside corners. The standard approach is coping rather than mitreing, which involves undercutting one piece to overlap the other. Coped joints hold up better over time as the house moves, but they take practice to cut cleanly.
Dealing with door casings. Where the baseboard meets the casing, you typically use a small plinth block or a return cut, both of which require precise fitting.
None of this is impossible for a skilled and patient DIYer, but it’s not a weekend beginner project either. Rushed baseboard installations are among the most common things that need to be redone during a renovation.
Ready to Get It Done Right?
Now that you know your flat from your colonial and your MDF from your solid oak, you’re ahead of most people who walk into a trim supplier. The next step is making sure those baseboards actually end up looking as good as you’re imagining.
If you’d like a hand with the planning, material selection, or professional installation, our team at Summit Doors and Trims is happy to help. We work with homeowners across Edmonton to make sure every room is finished the way it deserves to be.
Get in touch with us here, and let’s talk about your project.